How I made the music video for “gaze upon the stars”
Draft
•18 min read
Warning!This is an incomplete early version of the blog post, which was shared with the Home Paige Discord members.
Last time, I talked about how I created one of my best songs, “gaze upon the stars”. Today, I’m finally here to discuss its music video.
If you’re wondering what took me so long this time, the hot weather here prevented me from doing too much on my PC. It tends to turn into a space heater under load, and the space it’s heating happens to be very small, so it quickly spirals out of control. But without further ado, let’s dive into it!
The animation was created in Unreal Engine (version 5.7.4, to be exact), which happens to be the same engine Home Paige uses. I had previously tried both Unity and Godot, but neither of them really ended up working out. But that’s not to say Unreal doesn’t have its flaws either. Not by a long shot, in fact…
Hey, just so you know, whenever I say UE or Unreal, I’m referring to Unreal Engine.
Tangent: Unreal Engine woes
(TODO: consider adding images to the tangent section)Let me take you on a tangent to talk about some of the issues I’ve experienced with Unreal. It’s not important for the rest of the article, so if you don’t care, just skip to the next section here.
Linuxn’t
Unreal Editor 5.7 uses Wayland on Linux by default, and it might just have the worst Wayland support I’ve ever seen in the nearly 2 years I’ve been daily driving Linux. There’s a post about it on the Unreal Engine forums if you want to learn more.
To fix this, I first had to launch Unreal Engine with the SDL_VIDEODRIVER=x11 environment
variable, to force it to go back to X11 and run under Xwayland. That alone wasn’t enough though,
because it broke a bunch of other things instead. Thankfully I found a fix in
that same forum thread,
although it’s still not perfect.
According to that forum post, these issues are supposedly fixed in UE 5.8. I haven’t tested it yet though, because I don’t want to wait ages for it to first download, and then compile a stupid amount of shaders, just for a chance that my project ends up breaking…
Miscellaneous Instabilities
There have also been some other issues. For instance, every time I launch the project, the grass just doesn’t exist, and I have to reopen the level to fix it. Or sometimes when I save certain things, the terrain in the distance just freaks out.
Unreal Engine has also crashed on me several times, most notably when switching from the cinematic viewport to the normal one. Quite annoying when you’re working on cinematic stuff like this, don’t you think?
Unexpected Blackout
Finally, in the process of writing this article, Unreal Editor decided it was no longer going to render the viewport (specifically in Lit mode). That’s what inspired me to write this section in the first place, although as it turns out, it may not have been Unreal’s fault.
I tried many things to resolve this, including:
- Turning it off and back on again (man, usually that one does it…)
- Re-downloading Unreal Editor
- Re-enabling Wayland support
- Upgrading to the UE 5.8 preview. That one actually made it much worse, as it either made the entire window black, or straight up crashed my GPU.
I then looked in the Discord server for my distro (Nobara), and found someone else who also started running into this issue after an update on 14 May. Armed with the knowledge that it was likely a driver or kernel issue, I switched to an experimental build of the Mesa driver, and it worked!
Ironically, the build it installed was still a month old (from 20 May, to be exact). That’s likely because Nobara hadn’t been getting package updates for a while, since a new major version was in the works. And actually, I started getting severe graphical glitches in Unlit mode instead. Well this is just a certified Linux moment…
Concluding this Tangent
As you can see, Unreal Engine does have its fair share of issues, even more so on Linux. A bit unfortunate considering how good the Linux desktop is getting these days, although supporting it can be quite a hassle at times. However, Unreal’s tools for creating so-called linear content compensate for that just enough for me to keep using it.
Chapter 2: The Music Video
When I publish this blog post, I will see if I can upload the Unreal Engine project somewhere, but for now you’ll have to make do with what I’ve written. There are plenty of images here for you to recreate some of the project’s assets, though.
In this article, I’ll go through some of the assets, materials, techniques and other stuff I used to make the music video. Keep in mind this was my first time using Unreal, so there is a fair bit of jank involved. That… isn’t exactly unusual for me, to be honest.
It may also get a bit technical in places. I will probably try to improve some of the sections before release. Anyway, with all of that aside, let’s go over how the music video was made, shall we?
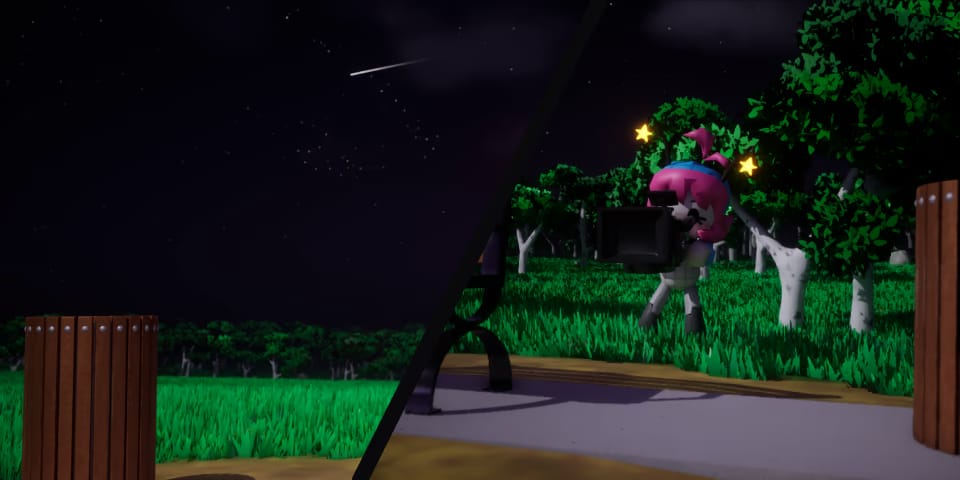
Gazing upon the Stars
Since the song is titled “gaze upon the stars”, obviously the sky needed some stars to gaze at. And for some reason, UE5’s default sky just doesn’t have any of them, which is unfortunate.
You might say you can drop in the legacy sky blueprint left over from older versions of Unreal, which does have stars, but those are not animated. And that’s just lame. They do offer another solution, the Celestial Vault plugin, but it completely broke my lighting setup, so I couldn’t use it.
I initially used a Fab asset called Good Sky to handle the sky, which did have animated stars. However, when I posted an early version of the music video in the Home Paige Discord server, people craved for more. They wanted shooting stars and constellations. And Good Sky wasn’t going to cut it for that. So I ended up doing it myself, by making my own sky material.
The Path to Stars
Fun fact!I used a very similar approach to create the animated starry background of this very website using WebGL. The source code for that is available on GitHub.
Can’t see said background? Then make sure the Immersive Mode and Background preferences are enabled.
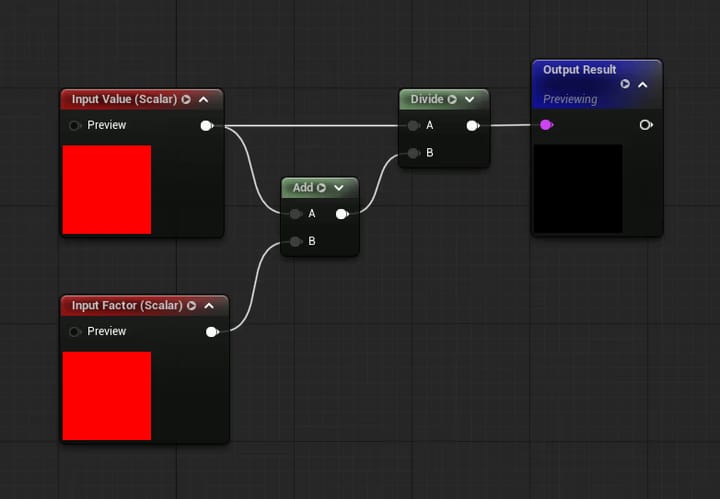
Of course, in order to make a night sky, you need some stars. And because I wanted to make them procedural, I used some noise for that. But first I needed a position to feed into the noise function. Good Sky did actually come in handy, as its skydome mesh comes with texture coordinates that are well suited for this.
In order to get those coordinates scaled down and moving, I wrote this material function (so I could re-use it):
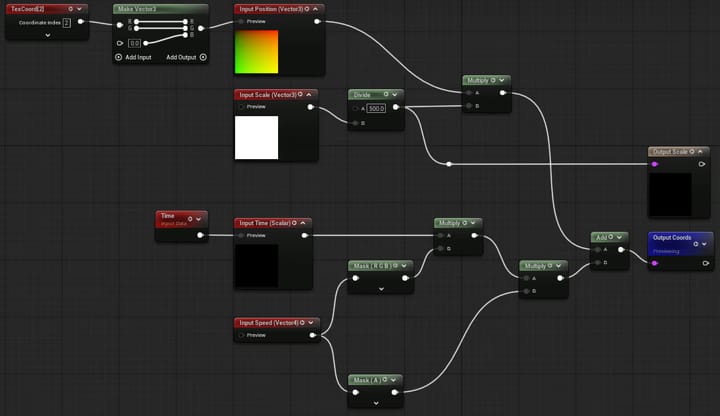
Now feed it some parameters, and out comes a position that you can give to a noise function. Interestingly, I found that Unreal Engine’s gradient noise gave me the best looking stars.
Hey!The Sequencer Time node you see in these graphs comes from another named reroute. I talk about it later in the article. If you’re not planning to use the Sequencer, just use the normal Time node.
Twinkle, Twinkle
Cool. Now we have moving stars. But here on Earth, stars don’t just appear to move, they also twinkle. So how do we do that? Why, with more noise, of course!
The graph is essentially the same as the above, just with different parameters. So instead of adding another image, here’s a complete list of the things I changed for the twinkle noise:
- Inputs:
- Speed →
-1, -0.6, 0.6, 0.125 - Scale →
22 - Density →
0.87
- Speed →
- Noise parameters:
- Function →
Simplex - Texture Based - Level Scale →
1.4
- Function →
- There’s also a 1-x node after the last Saturate node, just before the final output.
You then multiply the stars with this new noise, et voilà, twinkling stars! Okay, there’s a bit more going on afterwards, but I’ll save that for the end.
Colouring them in
Stars are also not just pure white. They can have a whole range of temperatures, resulting in colours from orange to white to blue. It is pretty subtle though, which is why people often just make stars white. Most of us simply don’t care all that much.
I do care, though. And that means it’s time to add another layer of noise in the mix:
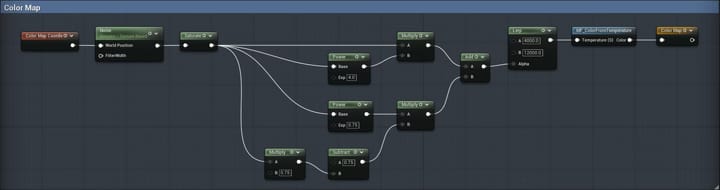
There is a lot of math involved here to try and get a more reasonable colour temperature range.
There is a lot of math involved here to try and get a more reasonable colour temperature range.
And here’s the function for getting the colour from a temperature, based on this algorithm from Tanner Helland. It probably didn’t need to be this complex, but whatever.
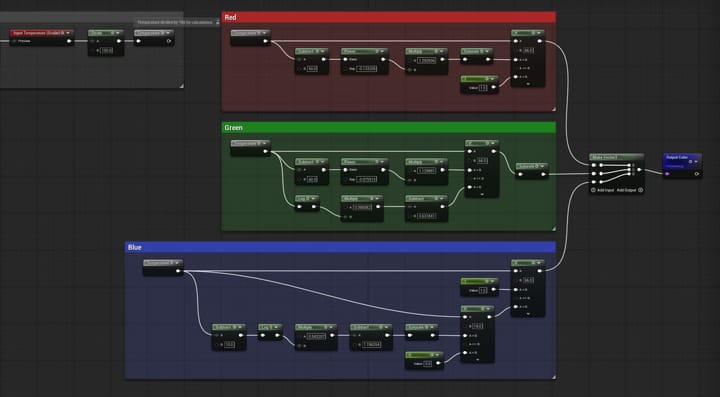
Again, you multiply the final colour noise with the twinkling stars to make them coloured. Easy! The end result is barely noticeable though, and in hindsight I could’ve saturated the colours a bit. Oh well. It’s still a bit better than just plain white.
I didn’t actually do this part for the website yet. Maybe later…Paige in the Sky
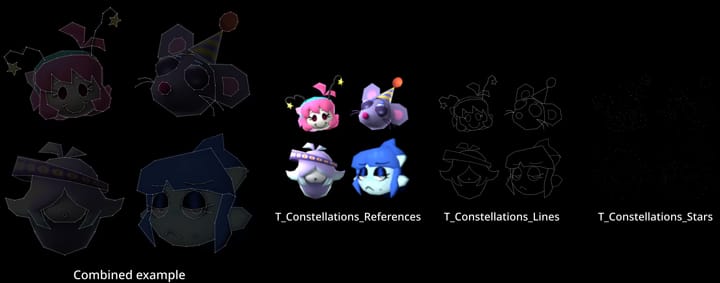
I mentioned before that I got a request to add constellations to the sky, specifically ones depicting some of the Home Paige characters. Now that I have a custom sky material, it shouldn’t be that hard, right…?
Well, there is a problem, and it’s that I’m not particularly good at drawing. And with the way I implemented constellations, I had to draw them myself. And the images I ended up referencing were no more than 128 x 128 pixels in size, which is just abysmal for trying to convert to dots and lines.
I persevered though, and after a week or so I ended up with this. It’s pretty scuffed in places, but thankfully that doesn’t really matter. I just found out I forgot some things, though, like part of Sophy’s hair and possibly the stars for Oselle’s mouth. Oops.
Constellation Implementation
You may have noticed the constellation texture contains 4 of them, and that it’s actually split into 3 separate layers. That way I can customize them more easily inside of Unreal Engine. However, that does mean it’ll take a bit more effort to get them into the sky.
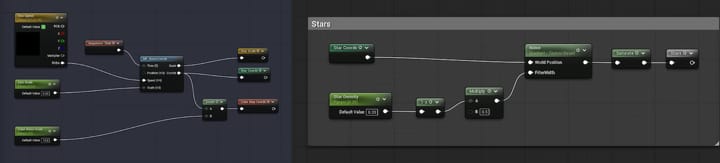
First, another function. Since the constellations only need to cover a small portion of the sky, we need to manipulate the UVs properly, as well as create a mask. Here’s how:
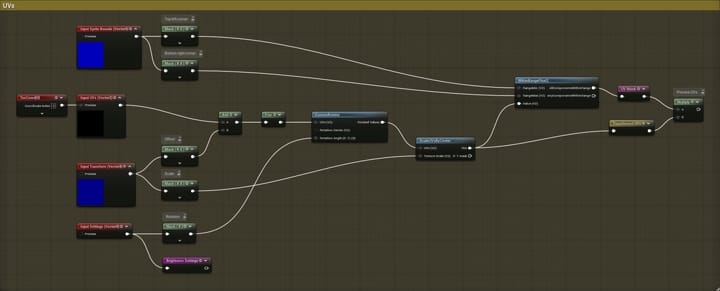
All functions used here are built into Unreal Engine.
All functions used here are built into Unreal Engine.
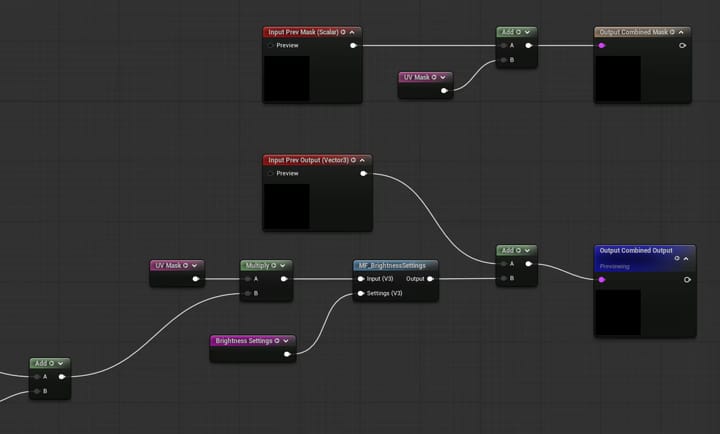
Next, we need to sample the layer textures, change their intensities and combine them together. While there are 4 layers here, the last one is just a black texture in this case, so you can omit it if you don’t need a 4th layer.
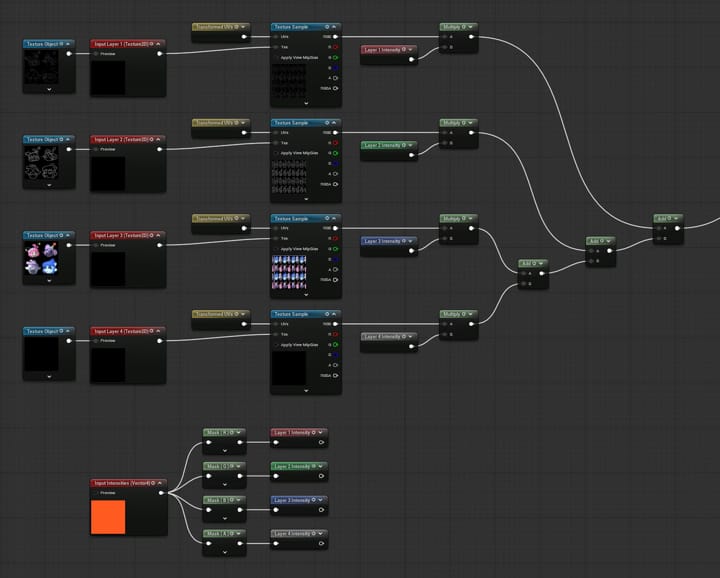
Finally, we mask away the portion we don’t need, adjust the brightness and contrast with a custom function (more on that later), and accumulate it with the previous constellations. We also combine the masks together; you’ll see why in just a moment.
Now that we have our constellation function, we just need to put it to use. Let’s start off with the
common inputs, most importantly the UVs. You may have noticed the MF_NoiseCoords function from
earlier has that scale output; we can use it together with the Star Speed parameter we
previously defined for the stars, in order to match their speed perfectly.
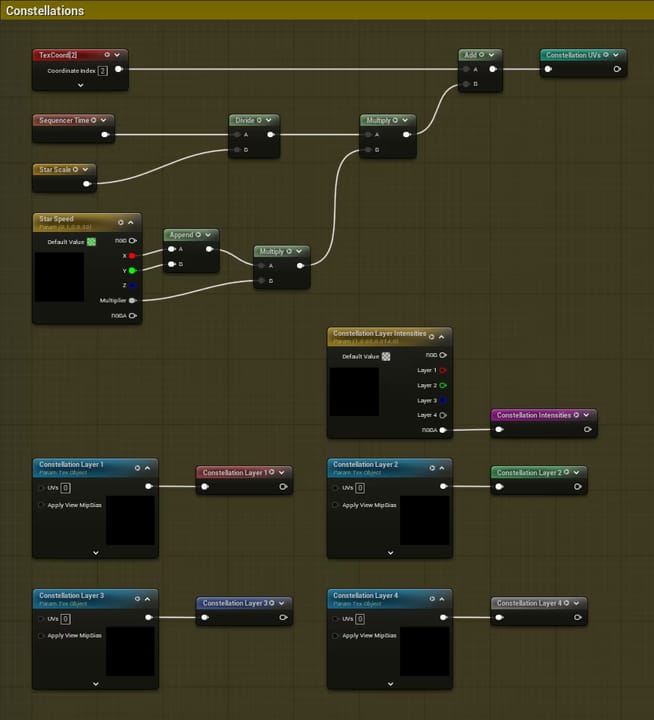
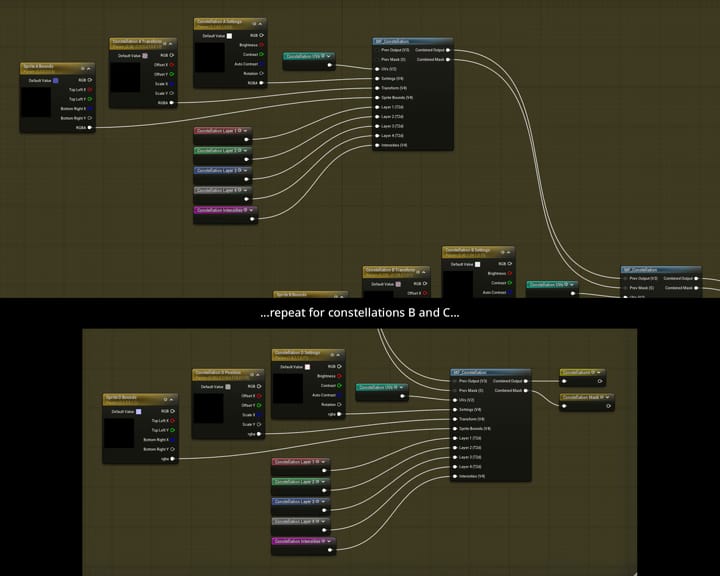
Lastly, we call the function with a bunch of parameters to get our combined constellation output. This involves a lot of copy-pasting, so I won’t show the full graph here.
Completing the Material
Neat! We’ve got everything we need to finish off the sky material now. You may say we haven’t talked about the shooting stars yet, but those aren’t actually part of the skybox, so I’ll talk about it after this. And no, there’s no moon either. It would’ve been offscreen anyway.
Here we take everything we’ve made up until now, adjust their brightness and combine them. We can use the accumulated constellation mask to hide the stars near constellations, so that they’re a bit more clear. We also bring in the atmosphere produced by the level’s SkyAtmosphere.
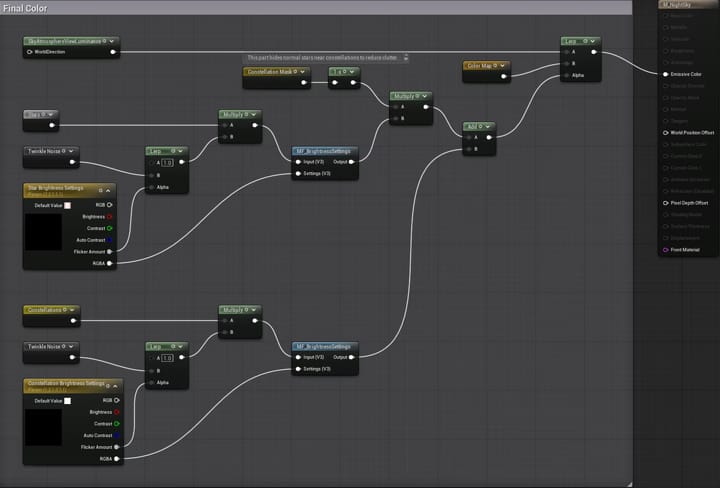
The brightness function used here and in the constellation function is pretty simple:
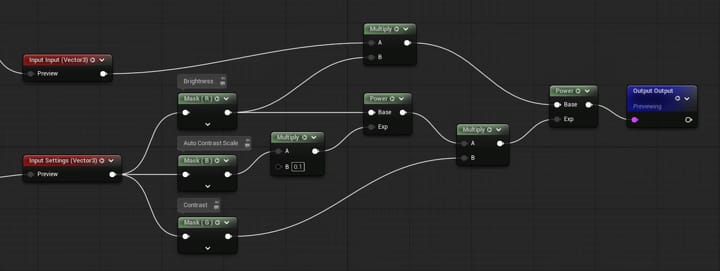
One more thing. In order to be able to use our new material as a skybox, we need to change 2 material properties:
- Material/Shading Model →
Unlit - Material/Advanced/Is Sky →
And that’s it! We finally have our procedurally generated skybox. We just a few things left to talk about…
Shooty Starry Particles
Remember, I was also asked to add shooting stars (aka meteors). Putting these directly into the sky material isn’t a good idea, so instead, let’s talk particles. In Unreal Engine, this is handled by the Niagara VFX system.
I’m not going to dive into the details here, as that would take way too long. Just know that I used the Radial Burst template as a starting off point. The most important thing is that the spawn rate was set specifically so that it would make the meteors appear in time with the song’s tempo:
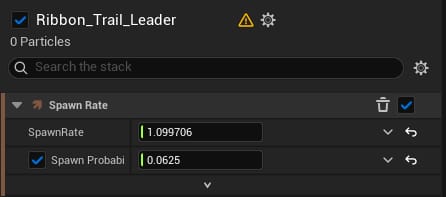
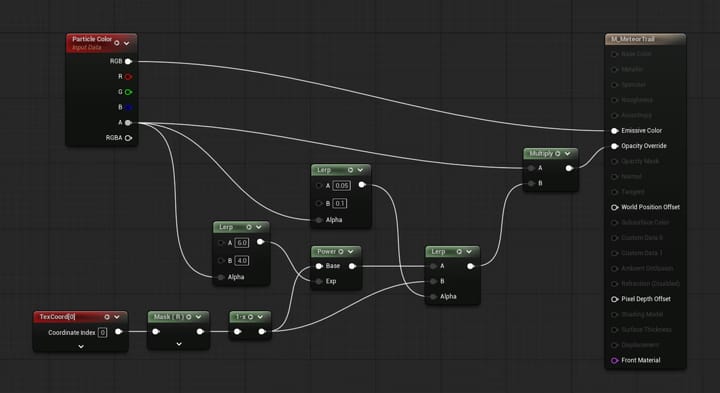
The spawn rate is perhaps a bit high, so just pretend it’s a meteor shower or something. I also disabled the template’s sprite renderer, as it was causing ugly artefacts in renders. Lastly, I whipped up another material to get the ribbon trails to look how I want them to:
Puffs of Cloud
Naturally, the clouds aren’t part of the sky material either. In fact, they’re just Unreal Engine’s default volumetric clouds. I did, however, tweak the settings to make them much less detailed and not as dense:
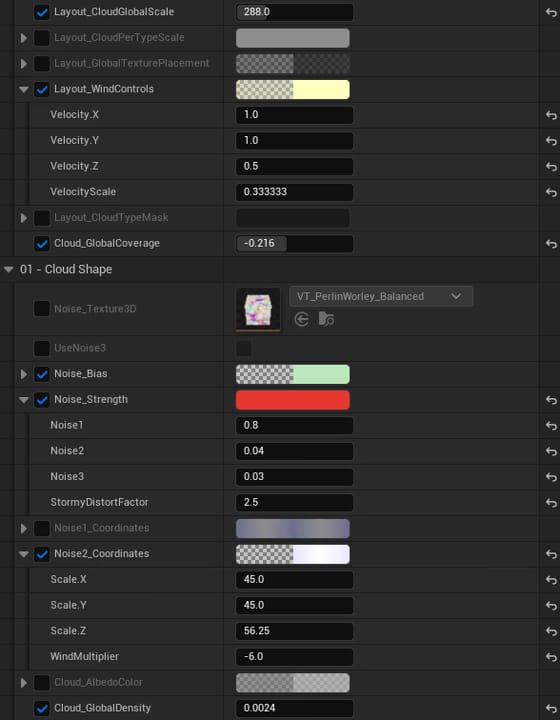
These clouds do have an effect on the overall lighting, which results in some of the images in this article having different brightnesses than each other. But without them, the shadows simply become too dark. Oh yeah, and they’re also tinted purple.
With that, our night sky is complete! We can finally move on to the next subject, which is the scenery.
Making a Scene
Having a night sky is nice, but it would be even nicer if there were a few more things to look at. I started by spending quite a while trying to create a nature scene which I both liked well enough and would also sort of fit in with the Home Paige aesthetic. Eventually I settled on the Cozy Nature pack on Fab, which I then used to create this landscape:
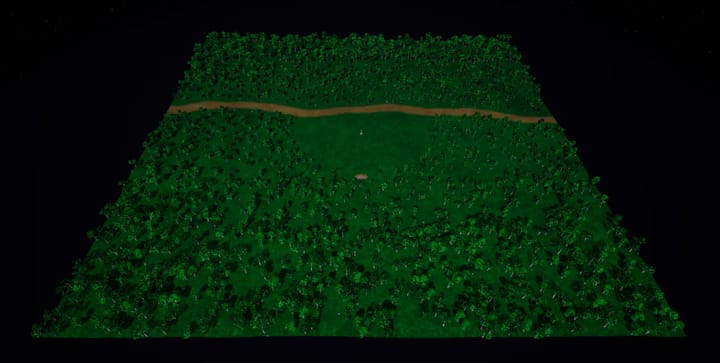
I did end up tweaking a bunch of the materials from this addon, although whether I did a good job of that is debatable.
Light it Up
(TODO: maybe give the text 'post-processing' a gradient animation)No scene is complete without lighting. For this, I threw in something special by making the darker tones a bit purply. That helps to give the lighting some character. The light level ended up a bit darker than I would’ve liked though, especially after YouTube’s colour mangling, but I suppose it works. It is nighttime, after all.
Of course, you can’t really have an Unreal Engine project in 2026 without post-processing. The 2 main ones we’ve got here are bloom…
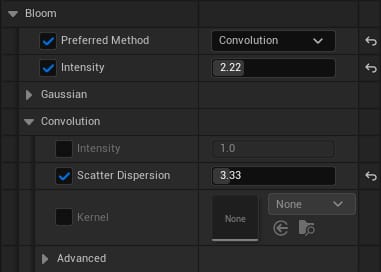
…and a touch of extra vignette. Nothing too fancy.

Oh, technically lens flares were also enabled, but they were turned down so much they might as well have not been there. Not like they would’ve fit in all that well…
Foreground Fill-In
All of that is cool and all, but where is Paige supposed to sit? On the ground? Well, funny you say that. I originally wanted Paige to lay down on a picnic towel, but my lacklustre animation skills couldn’t find a good pose for her. So instead… park bench.
If you thought my animation skills were lacklustre, you haven’t seen my 3D modelling skills. Or more precisely, my total lack thereof. As such, I had to resort to the next best thing: a free Sketchfab model1.
I also added a recycling bin on the other side, also from Sketchfab2. Why, you may ask?
- A park needs to have a place to deposit your rubbish into, and…
- …you know… Recycling Bin? The place that Home Paige is set in? I can make references too, you know.
A Slab of Concrete…ish
Because the terrain isn’t exactly flat, trying to place objects on it would have them clip into the ground. And that’s no good. To resolve this, I added a grey slab. That on its own is boring however, so let’s construct it out of concrete instead.
For some reason, I thought it was a good idea to build my own procedurally generated concrete-like material. Was that really necessary? Maybe not, but it did make me learn to use Unreal’s material editor, which in turn helped me create the custom sky.
Stack the Layers
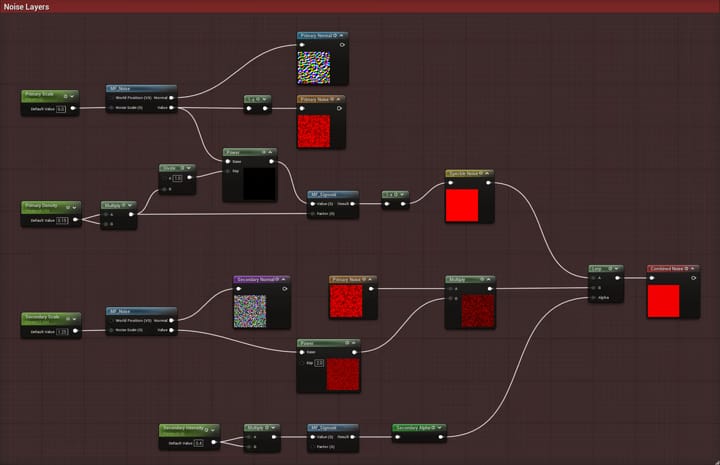
We start off with – you guessed it! – more noise. Let’s go over each layer here one by one.
- We’ve got a course, primary noise layer.
- That layer is then exponentiated a ton and then inverted, in order to turn it into a few occasional speckles.
- Then we have a finer secondary noise layer for some extra detail.
- Finally, that gets multiplied with the primary noise to break it up a bit, and is then blended with the speckles to get our final, combined noise layer.
There are 2 more material functions at play here. The first is a simple helper function to make some noise:
And the second is a crude little sigmoid function; a function that gets closer to 1 as the input increases, but never actually reaches it. Technically it should do the same for negative numbers but approaching -1 instead, but I just skipped it since there are no negative numbers to be seen here.
The factor defaults to 1. To properly handle negative numbers, you should just be able to
put an Abs node between the input value and the Add node.
The factor defaults to 1. To properly handle negative numbers, you should just be able to
put an Abs node between the input value and the Add node.
Materialization
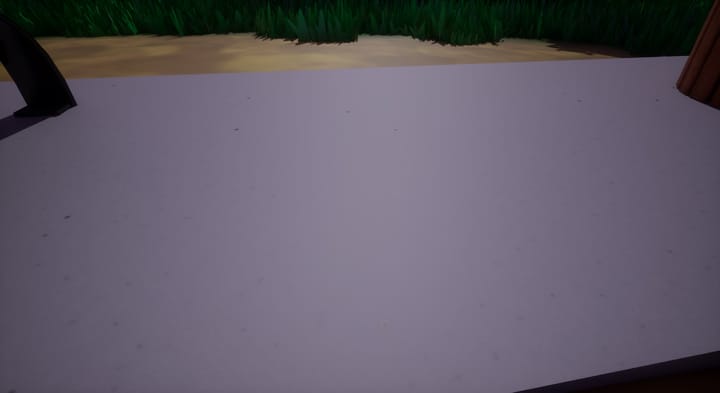
Now it’s just a matter of turning that noise into a decent-looking material. If we use our combined noise layer to blend between some material values, it’s already starting to look like something:
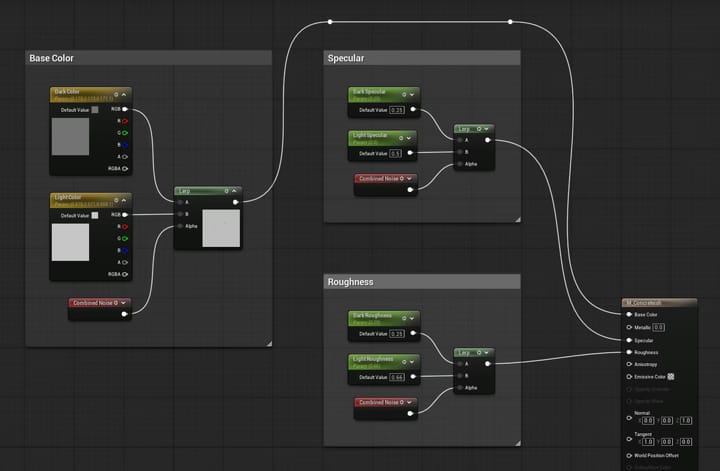
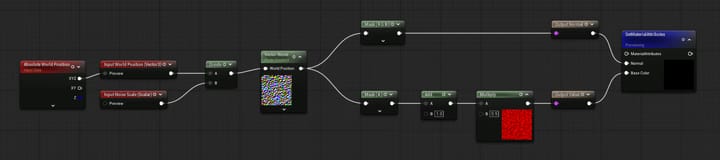
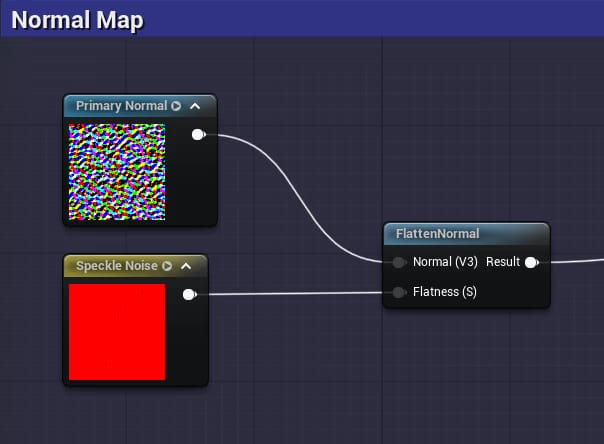
But we can do better than that. You see, the noise function we’ve been using also puts out 3D vectors that are well suited for normal maps. If we take the vectors from our primary noise layer, only use them where there are speckles, and plug that into the material’s Normal input, those dark spots will become more pronounced and 3D-like:
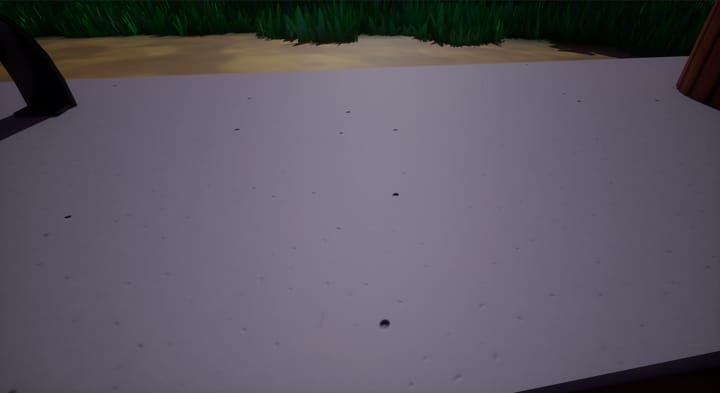
Perhaps it’s still looking a bit plain though. No worries, we have more noise where that came from. With this, we can give it a bit of texture:
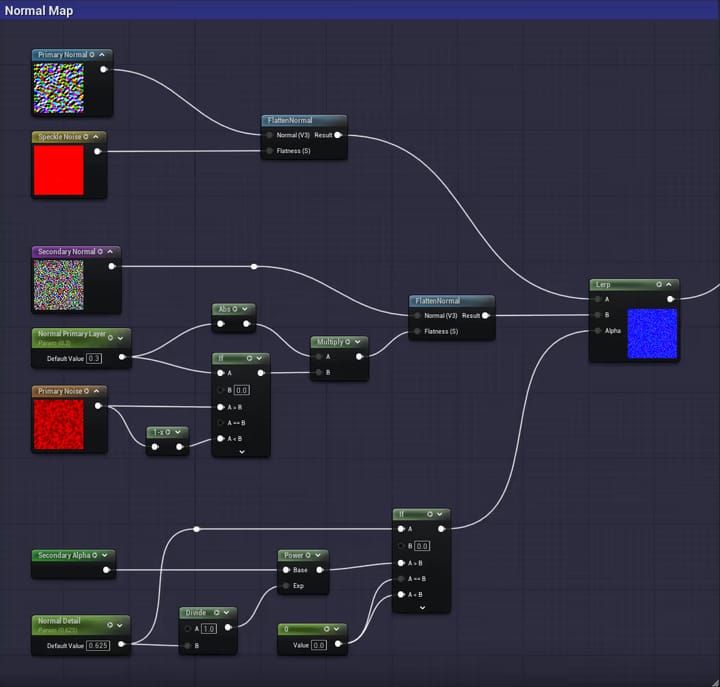
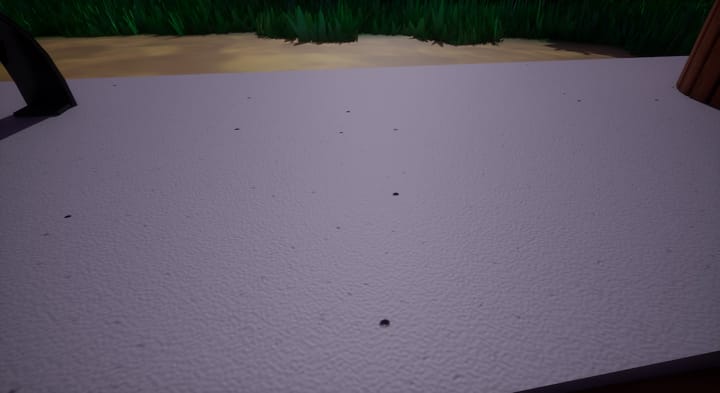
Hey, that’s not all that bad. There’s definitely still some room for improvement, but I can work with this. And we’ve always got a bunch of parameters to tweak, too.
But where’s Paige?
You’re saying we made it this far into the article, and we haven’t even talked about our main protagonist here? That’s just unacceptable. And in fact, you’ll have to keep waiting, because I’m currently trapped in another week-long heatwave…
(TODO: write the entire section about Paige)It’s Sequencer Time!
We’ve now discussed just about everything you can see, so let’s get to animating the music video. Unreal Engine conveniently has some really powerful tools dedicated to stuff like this, which is what led me to try it out in the first place.
Camera-nimation
(TODO: finish writing the Camera-nimation section)One cool trick we can do with this new camera is animating the exposure compensation to create a fade effect, like so:

Make sure to use a curve like the one shown here, especially for longer fades. Otherwise, it’ll simply stay black for too long.
Make sure to use a curve like the one shown here, especially for longer fades. Otherwise, it’ll simply stay black for too long.
Doing it this way will make the darker parts of the image fade out faster, while bright things (like Paige’s star antennae ) will remain visible for longer. Just like a real camera!
Staying in Sync
Avoiding Audio Issues
Being able to drag any imported audio file straight into the Sequencer is nice and all, however I noticed that the audio would de-sync more and more while playing. Not exactly ideal when you’re trying to make a music video. You can set the Sequencer’s clock source to Audio to try and combat this…
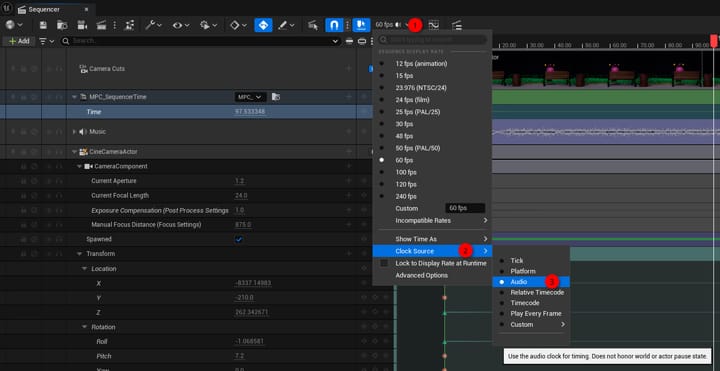
…but while it does fix the de-syncing, for some reason, it makes the audio crackly instead.
Thankfully I found
a solution to this
on the forums, namely the console command Sequencer.Audio.
Fun fact!You can throw this command in a configuration file if you want it to be enabled by default. I ended up adding it to Unreal Editor’s
ConsoleVariables.ini:[Startup] Sequencer.Audio.UseAudioClockForAudioDesync = 1
Sequencer-driven Materials
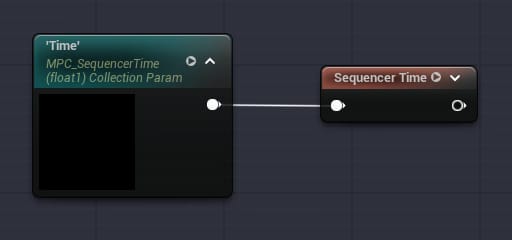
Normally, if you want a material to evolve over time, you would use the appropriately named Time node, which just outputs the world time in seconds. However, I wanted the sky to move in sync with the Sequencer. And since Unreal Engine doesn’t let you (easily) sequence material parameters, I instead used what’s called a material parameter collection.
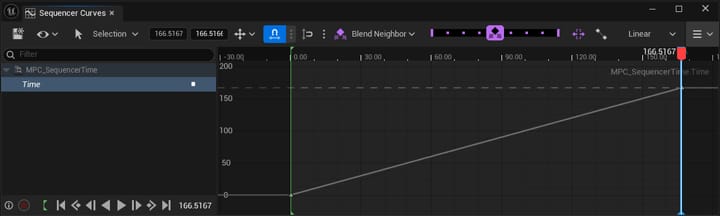
So, what I did is I created one of these collections, containing nothing more than a scalar Time parameter. Then I added it to the Sequencer and animated it to always hold the sequence’s current time:
Now it’s just a matter of referencing this in any materials we want to stay in sync with the sequence, and using it in place of the Time node. This is where that Sequencer Time node originates from in previous graphs.
Particles
Particle systems, like the one that handles our shooting stars, also need a bit of tweaking to get them synchronized with the Sequencer. The Unreal Engine documentation fortunately already has this case covered, but to summarize it essentially boils down to making the emitter deterministic and adding a lifecycle track to the sequence.
Exporting the Video
(TODO: write the exporting section)Conclusion
Hey, since you’ve made it all the way to the end, if you found something I missed, let me know in the Home Paige Discord server or something.
(TODO: write a proper conclusion)Footnotes
-
“Park Bench” (https://skfb.ly/onCvs) by plezzo is licensed under Creative Commons Attribution. ↩
-
“Park Trash Can” (https://skfb.ly/6RHxU) by Pippa is licensed under Creative Commons Attribution. ↩